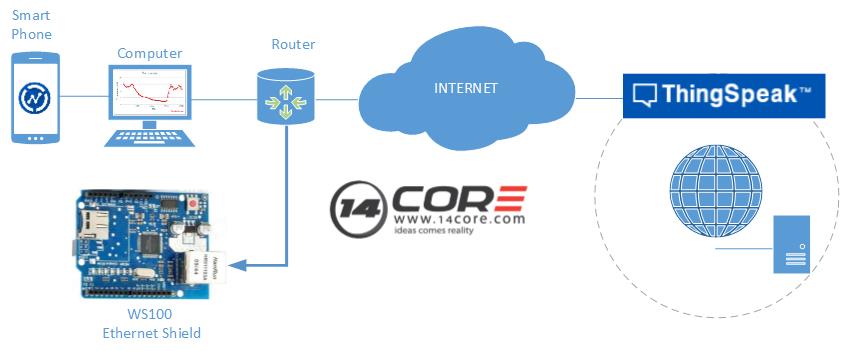
#include <SPI.h>
#include <Ethernet.h>
// Local Network Settings
byte mac[] = { 0xDE, 0xAD, 0xBE, 0xEF, 0xFE, 0xED }; // BIA or Physical mac address of W5100 Shield
byte ip[] = { 192, 168, 1, 100 }; // IP ADDRESS of your device
byte gateway[] = { 192, 168, 1, 1 }; // internet access via router
byte subnet[] = { 255, 255, 255, 0 }; // 24bit Subnet Mask
//EthernetServer server(80); //server port
//byte gateway[] = { 192, 168, 0, 1 }; //Internet access via router
//byte subnet[] = { 255, 255, 255, 0 }; //24 Bit Subnet Mask
//byte myserver[] = { 208, 104, 2, 86 }; // zoomkat web page server IP addre
// ThingSpeak Settings
char thingSpeakAddress[] = "api.thingspeak.com";
String writeAPIKey = "Mwrite_API_key";
const int updateThingSpeakInterval = 25 * 1000; // Time interval in milliseconds to update ThingSpeak (number of seconds * 1000 = interval)
// Setup the variable
long lastConnectionTime = 0;
boolean lastConnected = false;
int failedCounter = 0;
// Initialize Ethernet Client
EthernetClient client;
#include <DHT.h>
#define DHTPIN A0 // Analog 0 which is the sensor will be place
#define DHTTYPE DHT11 // DHT 11
//#define DHTTYPE DHT22 // DHT 22
DHT dht(DHTPIN, DHTTYPE);
float te, te0;
float has, has0;
int te1, te2;
int has1, has2;
void setup()
{
// Start Serial for debugging on the Serial Monitor
Serial.begin(9600);
// start the Ethernet connection and the server:
Ethernet.begin(mac, ip, gateway, subnet);
// server.begin();
Serial.print("server is at ");
Serial.println(Ethernet.localIP());
dht.begin(); // Humidity Sensor Initialize
// Start Ethernet on Arduino
startEthernet();
}
void loop()
{
// Read value from Analog Input Pin 0
// String analogValue0 = String(analogRead(A0), DEC);
te = dht.readTemperature(); // read temperature
te0 = 10*te; // multiplied with 10
te1 = te0/10; // integer value
te2 = te0 - te1*10; // value after point
if (te2<0) te2=-te2; // if temperature is negative
has = dht.readHumidity();
has0 = 10*has;
has1 = has0/10; // integer value
has2 = has0 - has1*10; // value after point
//String analogValue0 = String(te, DEC);
//String analogValue1 = String(has, DEC);
String analogValue0 = String(te1, DEC);
analogValue0 += ".";
analogValue0 += String(te2, DEC);
String analogValue1 = String(has1, DEC);
analogValue1 += ".";
analogValue1 += String(has2, DEC);
//String analogValue0 = String(24.5, DEC);
//String analogValue1 = String(37, DEC);
// Print Update Response to Serial Monitor
if (client.available())
{
char c = client.read();
Serial.print(c);
}
// Disconnect from ThingSpeak
if (!client.connected() && lastConnected)
{
Serial.println("...disconnected");
Serial.println();
client.stop();
}
// Update ThingSpeak
if(!client.connected() && (millis() - lastConnectionTime > updateThingSpeakInterval))
{
// updateThingSpeak("field1="+analogValue0);
updateThingSpeak("field1="+analogValue0+"&field2="+analogValue1);
}
// Check if Arduino Ethernet needs to be restarted
if (failedCounter > 3 ) {startEthernet();}
lastConnected = client.connected();
}
void updateThingSpeak(String tsData)
{
if (client.connect(thingSpeakAddress, 80))
{
client.print("POST /update HTTP/1.1\n");
client.print("Host: api.thingspeak.com\n");
client.print("Connection: close\n");
client.print("X-THINGSPEAKAPIKEY: "+ writeAPIKey +"\n");
client.print("Content-Type: application/x-www-form-urlencoded\n");
client.print("Content-Length: ");
client.print(tsData.length());
client.print("\n\n");
client.print(tsData);
lastConnectionTime = millis();
if (client.connected())
{
Serial.println("Connecting to ThingSpeak Server");
Serial.println();
failedCounter = 0;
}
else
{
failedCounter++;
Serial.println("Connection to ThingSpeak failed ("+String(failedCounter, DEC)+")");
Serial.println();
}
}
else
{
failedCounter++;
Serial.println("Connection to ThingSpeak Failed ("+String(failedCounter, DEC)+")");
Serial.println();
lastConnectionTime = millis();
}
}
void startEthernet()
{
client.stop();
Serial.println("Connecting to current network please wait...");
Serial.println();
delay(1000);
// Connect to network amd obtain an IP address using DHCP
if (Ethernet.begin(mac) == 0)
{
Serial.println("DHCP Failed, reset the device and try again");
Serial.println();
}
else
{
Serial.println("Connected to network w/d DHCP");
Serial.println();
}
delay(1000); // Delay at 1 Seconds
}


