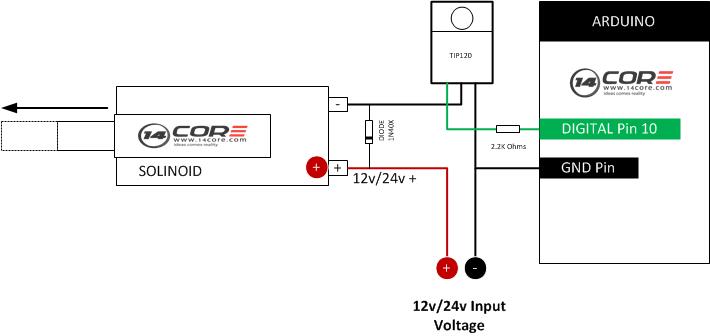
In this illustration we will going to drive the solenoid with the input voltage of 12v to 24v using TIP120 Transistor. Because Arduino can only support power output of 3.3 and 5v this is not enough to work with the solenoid and some other device that works on 12 to 24v. Using a transistor we can drive this device at 12v or 24v. The TIP120 Darlington Transistor is one of the other ways to drive higher voltage to control this device with the Arduino Microcontroller. These transistor is very common in all the electronic shops.
Transistor acts as a switch and when the BASE (B) on the transistor is LOW, the collector (C) is disconnected from the Emitter (E). For example when the Arduino send a 5v signal to the transistor Base (B) the transistor will connect the collector (C) and the Emitter (E) together and isolate the circuit to drive the Solenoid.
Note: Do not connect the positive ends of the 12v – 24v supply to the Arduino Board this could easily burn the Arduino Board.
Required Components
1x Arduino UNO/MEGA/PRO/NANO
1x Solenoid
1x TIP120 Darlington Transistor
1x Solder Less Bread Board
1x Jumper Wires / DuPont Wires
Wiring Diagram


