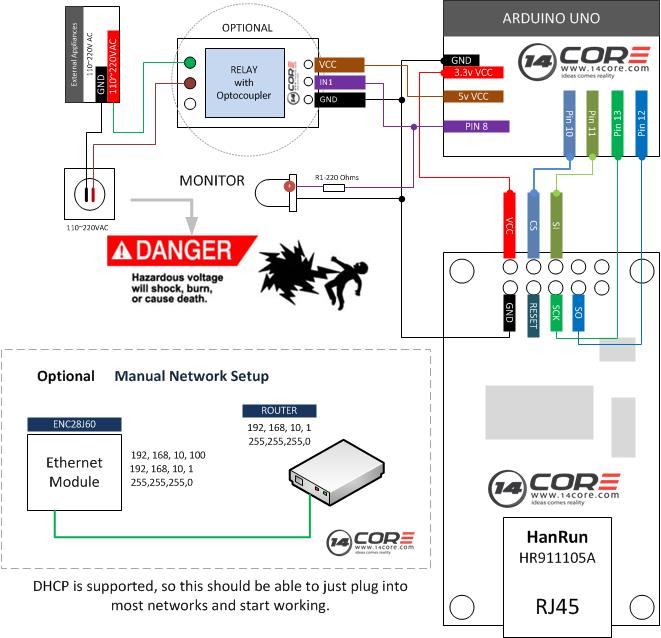
In this illustration we will going to wire the ENC28J60 Ethernet Module. This module is another widely used network module for popular microcontroller, the early Arduino network module is accomplished by mean of ENC28J60, although later a new Arduino network module come up based on W5100 chip, but the ENC28J60 is also widely used due to stability and reliability.
With this Ethernet module your Arduino can be used to connect to internet capable adapting TCP/IP protocol stacks true Arduino Ethernet library, and web client application to access distributed network sensors. Can adapt EtherCard / EtherShield code library to perform low-level interfacing with network interfaces, a high level routine are provided to allow variety of purposes including simple data transfer though HTTP.
Required Components
Arduino UNO/MEGA/NANO/PRO
ENC28J60 Ethernet Module
1x Resistor 220k
1x LED Red
Jumper Wires
Solder Less BreadBoard
Optional Components
Relay Module with Optocoupler/Isolator
Wiring Diagram
Arduino Sketch Code
|
1 2 3 4 5 6 7 8 9 10 11 12 13 14 15 16 17 18 19 20 21 22 23 24 25 26 27 28 29 30 31 32 33 34 35 36 37 38 39 40 41 42 43 44 |
/*__________________________________________________________ $$$$$$$$$$$$$$$$$$$$$$$$$$$$$$$$$$$$$$$$$$$$$$$$$$$$$$$$$$$$ 14CORE.com ARDUINO ETHERNET MODULE TEST CODE $$$$$$$$$$$$$$$$$$$$$$$$$$$$$$$$$$$$$$$$$$$$$$$$$$$$$$$$$$$$ ____________________________________________________________ */ #include <etherShield.h> #include <ETHER_28J60.h> int DrivePin = 8; //Pin 8 as our ouput to drive our LED or Relay static uint8_t mac[6] = {0x54, 0x55, 0x58, 0x10, 0x00, 0x24}; // mac address of your Router static uint8_t ip[4] = {192, 168, 10, 1}; // Router Ip Address static uint16_t port = 80;// Reads at Port 80 ETHER_28J60 e; void setup() { e.setup(mac, ip, port); // Initializing MAC (0x54, 0x55, 0x58, 0x10, 0x00, 0x24) IP(192, 168, 10, 1) and the PORT 80 pinMode(DrivePin, OUTPUT); // Initializing our Pin 8 as our Output } void loop() { char* value; if (value = e.serviceRequest()) { e.print("<H1>14CORE - Appliance Controller <br/> Led Test Code</H1>"); // Page Header of Webpage if (strcmp(value, "SWITCH ON") == 0) //String compare if value is same as ‘ turn ON’ { digitalWrite(DrivePin, HIGH); // if same then bring the pin 8 HIGH e.print("<A HREF='SWITCH OFF'>SWITCH OFF</A>");//print ‘Switch OFF’ } else if (strcmp(value, "SWITCH OFF") == 0)// string compare in value is same as ‘SWITCH OFF’ { digitalWrite(DrivePin, LOW); // if same then bring the pin 8 LOW e.print("<A HREF='SWITCH ON'>SWITCH ON</A>"); //print ‘SWITCH ON’ } e.respond(); //Updating the web browser } } |
Download EtherShield Code Library | Zip
Download ENC28J60 Code library | Zip


Examples
Several example scripts are provided with the library which demonstrate various features. Below are descriptions on how to use the library.
Note: ether is defined globally and may be used to access the library thus: ether.member.
To initiate the library call EtherCard::begin
uint8_t Ethernet::buffer[700]; // configure buffer size to 700 octets
static uint8_t mymac[] = { 0x74,0x69,0x69,0x2D,0x30,0x31 }; // define (unique on LAN) hardware (MAC) address
uint8_type nFirmwareVersion ether.begin(sizeof Ethernet::buffer, mymac);
if(0 == nFirmwareVersion)
{
// handle failure to initiate network interface
}
To configure IP address via DHCP use EtherCard::dhcpSetup
if(!ether.dhcpSetup())
{
// handle failure to obtain IP address via DHCP
}
ether.printIp(“IP: “, ether.myip); // output IP address to Serial
ether.printIp(“GW: “, ether.gwip); // output gateway address to Serial
ether.printIp(“Mask: “, ether.mymask); // output netmask to Serial
ether.printIp(“DHCP server: “, ether.dhcpip); // output IP address of the DHCP server
To configure a static IP address use EtherCard::staticSetup
const static uint8_t ip[] = {192,168,0,100};
const static uint8_t gw[] = {192,168,0,254};
const static uint8_t dns[] = {192,168,0,1};
if(!ether.staticSetup(ip, gw, dns);
{
// handle failure to configure static IP address (current implementation always returns true!)
}
Send UDP packet
To send a UDP packet use EtherCard::sendUdp
char payload[] = “My UDP message”;
uint8_t nSourcePort = 1234;
uint8_t nDestinationPort = 5678;
uint8_t ipDestinationAddress[4];
ether.parseIp(ipDestinationAddress, “192.168.0.200”);
ether.sendUdp(payload, sizeof(payload), nSourcePort, ipDestinationAddress, nDestinationPort);
DNS Lookup
To perform a DNS lookup use EtherCard::dnsLookup
if(!ether.dnsLookup(“google.com”))
{
// handle failure of DNS lookup
}
ether.printIp(“Server: “, ether.hispip); // Result of DNS lookup is placed in the hisip member of EtherCard.
I been looking for this guide, anyway. thanks Ive eaten already. just wondering if its possible to make it on STM or PIC.
Hello.
I am using an TP-LINK ethernet module.
I have an doubt. You have written that
“static uint8_t mac[6] = {0x54, 0x55, 0x58, 0x10, 0x00, 0x24}; // mac address of your Router”
Here does the MAC id belongs to ENC28J60 or my TP-LINK ethernet router ??