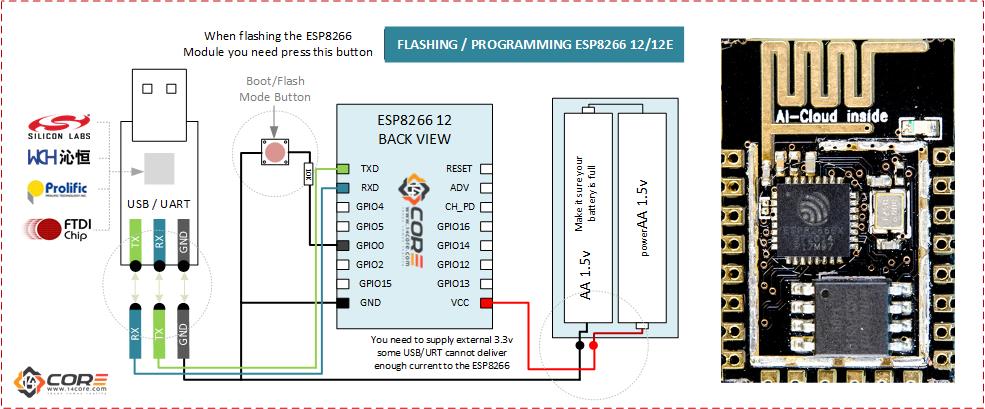
Another illustration how to wire the ESP8266 as server and client mode, therefore there is no need to use a router or smart phones to interact/communicate to the ESP8266, this is direct communication between 2 ESP module as server and client mode, ones the code is loaded the ESP8266 coded as server the client ESP8266 will automatically connect to the ESP8266 Server Access Point. As you can see the diagram on the ESP8266 client the push button is attach to pin D2 map on Arduino as GPIO pin 4 when button is pressed it will send a command to the server as value of 1 then the server will turn the D2/GPIO 4 to HIGH then LED light will turn on.
Required Components
- ESP8266 12/12E, ESP8266 7, ESP8266 NodeMCU, ESPDuino, WeMos.
- USB TTL UART / (Flashing/Programming the ESP8266 Module)
- Push Button
- Resistors
- LED
- Jumper Wire / DuPont Wire
- Solder Less Bread Board
- AA Battery
Wiring Guide

Programming / Flashing the ESP8266 12/12E
You need to install Arduino 1.6.8 from the Arduino website. available for Windows, Mac OS, and Linux (32 and 64 bit).
Open Arduino IDE and open the Preferences window then add {http://arduino.esp8266.com/stable/package_esp8266com_index.json} without bracket into Additional Board Manager URLs field. Note you can add multiple url separating them with commas. > http://arduino.esp8266.com/stable/package_esp8266com_index.json
Or you can follow this steps. http://www.14core.com/arduino-ide-with-esp8266-integration-for-ease-programming/

Source Code for Server
1 2 3 4 5 6 7 8 9 10 11 12 13 14 15 16 17 18 19 20 21 22 23 24 25 26 27 28 29 30 31 32 33 |
/* 14CORE | ESP8266 to ESP8266 Remote Client & Server Test /------------------------ SERVER ---------------------/ */ #include <ESP8266WiFi.h> const char APName[] = "SERVER"; const char WiFiSec[] = "1234567890"; //Set wifi password //const char WiFiSec[] = "" //Set AP np password const int R0 = 15; WiFiServer server(80); void setup() { Serial.begin(115200); pinMode(R0, OUTPUT); digitalWrite(R0, LOW); WiFi.mode(WIFI_AP); WiFi.softAP(WifiSec, APName); server.begin(); } void loop() { WiFiClient client = server.available(); // If client is connected if (!client) { return;} //Read client request String req = client.readStringUntil('\r'); if (req.indexOf("/R0/0") != -1) val=0; if (req.indexOf("/R0/1") != -1) val=1; digitalWrite(LED_PIN, val); client.flush(); } |
Source Code for Client
1 2 3 4 5 6 7 8 9 10 11 12 13 14 15 16 17 18 19 20 21 22 23 24 25 26 27 28 29 30 31 32 33 34 35 36 37 38 39 40 41 42 43 44 45 46 47 48 49 |
/* 14CORE | ESP8266 to ESP8266 Remote Client & Server Test /------------------------ CLIENT ---------------------/ */ #include <ESP8266WiFi.h> #include <ESP8266HTTPClient.h> const char* ssid = "SERVER"; //AP Name (Server Name) const char* password = "1234567890"; //Set wifi password //const char* password = "" //Open no password const char* host = "http://192.168.4.1"; //Default IP of ESP8266 String stateVal="0"; int val1; const int inVal1 = 5; // Pin Push Button HTTPClient http; void setup() { Serial.begin(115200); delay(10); Serial.print("CONNECTED TO AP: "); Serial.println(ssid); WiFi.mode(WIFI_STA); WiFi.begin(ssid, password); while (WiFi.status() != WL_CONNECTED) { delay(500); Serial.print("......."); delay(500); } Serial.println("CONNECTED..."); } void loop(){ val1=digitalRead(inVal1); if (val1 == 1){ //Turn val1 to HIGH state stateVal="1";} else{ stateVal="0"; } if(WiFi.status() != WL_CONNECTED){ WiFi.begin(ssid, password); delay(500); }else{ http.begin("192.168.4.1", 80, "/led/"+stateVal); int httpCode1 = http.GET(); //get value delay(100); } } |
Downloads
- Download ESP8266 HTTP Client Library | Zip
- Download ESP8266 WiFi Code Library | Zip


Hi sir,
I am tring to use your code but its seems at the server side it say’s
‘val’ was not decleared in this scope.
How to fix this. Thank you.
Hi! Please check your code there is no variable ‘val’ declared in server code.
‘digtalRead’ was not declared in this scope
Hi! Kelio.. the code above has been fix. actually it suppose to be digitalRead not digtalRead. :)
The schematic diagram has been updated. Thank you very much for your concern.. :)
need to be:
if (req.indexOf(“/led/0”) != -1) val=0;
if (req.indexOf(“/led/1”) != -1) val=1;
Soy Daniel de Valencia (España) . Me gustaría hablarte de un pequeño proyecto que tengo en mente. Como conectar entre si dos esp8266-01
Uno como cliente con entrada gpio2 de un sensor de lluvia, que manda orden ( cuando llueve) durante 20 segundos al otro esp8266-01 como servidor,
con salida por gpio2 a un relé, que hace que baje la persiana de una ventana.
La idea es meter el esp8266-01 (servidor) dentro de la caja empotrada de los pulsadores de subir/bajar la persiana.
La cuestión es que lo quiero hacer inalámbricamente.
Es posible hacer el proyecto?
He mirado mucho por internet y no he visto nada, podríais echarme una mano
Mi problema es, que de programación, NO tengo nada de idea. ¿Tu podrías desarrollar el código (sketch)que hiciera funcionar mi proyecto?
Muchas Gracias por la atención, espero tu ayuda. Un abrazo.
dazallu@hotmail.com
i have the val not declared in scope problem please help
which value is not declared? most provably that issue is come from the declared variables, see true it that all variables are properly utilize/ :D
Pingback:Point to Point / Server & Client Setup on ESP8266 & MCP9808 Temp Sensor | 14core.com