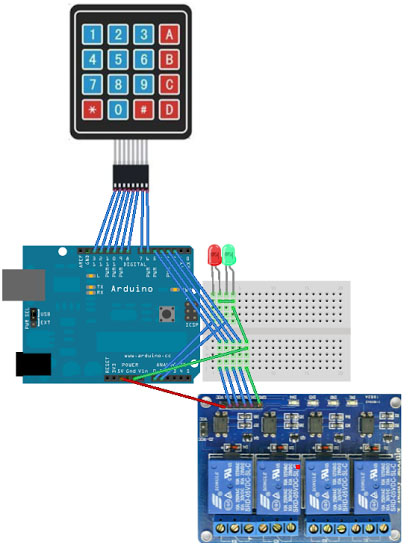
These tutorial will guide you to make a password access control using “Keypad Membrane” connected to a Relay Module, Were just temporarily used LED for the output just to check if it is working, instead using a mechanical solenoid door lock.
Here is the guide using a Relay module in Arduino
Electronic Required
- Arduino UNO / MEGA / PRO
- 2x LED (RED & GREEN)
- 1x Relay Module
- 1x Matrix Keypad Membrane
You can download the Keypad library here | > Zip
You can download the Password library here | > Zip
The LED’s
LED Red Positive Connected to Arduino A0(Analog)
LED Red Negative Connected to Arduino Ground
LED Green Positive Connected to Arduino A1(Analog)
LED Green Negative Connected to Arduino Ground
The Relay Module
Relay VCC Connected to 5v
IN1 Connected to Arduino Digital Pin 2
IN2 Connected to Arduino Digital Pin 3
IN3 Connected to Arduino Digital Pin 4
IN4 Connected to Arduino Digital Pin 5
Ground Connected Arduino Ground
The Matrix Keypad Membrane
Keypad Pin1 Connected to Digital Pin 6
Keypad Pin2 Connected to Digital Pin 7
Keypad Pin3 Connected to Digital Pin 8
Keypad Pin4 Connected to Digital Pin 9

|
1 2 3 4 5 6 7 8 9 10 11 12 13 14 15 16 17 18 19 20 21 22 23 24 25 26 27 28 29 30 31 32 33 34 35 36 37 38 39 40 41 42 43 44 45 46 47 48 49 50 51 52 53 54 55 56 57 58 59 60 61 62 63 64 65 66 67 68 69 70 71 72 73 74 75 76 77 78 79 80 81 82 83 84 85 86 87 88 89 90 91 92 93 94 95 96 97 98 99 100 101 102 103 104 105 106 |
/* Door Access Relays System on Arduino * * Using Matrix Keypad Membrane access password to enable the relays. * */ #include <Keypad.h> // http://arduino.cc/playground/uploads/Code/Keypad.zip #include <Password.h> // http://arduino.cc/playground/uploads/Code/Password.zip int relay1 = 2; // Define Arduino Digital pin 2 int relay2 = 3; // Define Arduino Digital pin 3 int relay3 = 4; // Define Arduino Digital pin 4 int relay4 = 5; // Define Arduino Digital pin 5 int locked = 1; int passinput = 0; int ledcurrentvar; int lockedled = 13; // Define pin 13 for Output LED int unlockedled = 12; // Define pin 12 for Output LED long flashvarLED = 0; long flashtimeLED = 300; const byte ROWS = 4; const byte COLS = 4; char keys[ROWS][COLS] = {{'1','2','3','A'},{'4','5','6','B'},{'7','8','9','C'},{'*','0','#','D'}}; byte rowPins[ROWS] = {13, 12, 11, 10}; byte colPins[COLS] = {9, 8, 7, 6}; Keypad keypad = Keypad( makeKeymap(keys), rowPins, colPins, ROWS, COLS ); Password password = Password("0000"); // Yo can change the password here void setup(){ Serial.begin(9600); pinMode(relay1, OUTPUT); digitalWrite(relay1, 255); pinMode(relay2, OUTPUT); digitalWrite(relay2, 255); pinMode(relay3, OUTPUT); digitalWrite(relay3, 255); pinMode(relay4, OUTPUT); digitalWrite(relay4, 255); pinMode(lockedled, OUTPUT); digitalWrite(lockedled, 255); pinMode(unlockedled, OUTPUT); digitalWrite(unlockedled, 0); } void loop(){ char key = keypad.getKey(); if(locked){ if(passinput){ unsigned long currentvarLED = millis(); if(currentvarLED - flashvarLED > flashtimeLED) { flashvarLED = ledcurrentvar; digitalWrite(lockedled, !digitalRead(lockedled)); } } else{ digitalWrite(lockedled, 255); } digitalWrite(unlockedled, 0); } if (key != NO_KEY){ Serial.println(key); password.append(key); passinput = 1; if(key == '*'){ password.reset(); passinput = 0; locked = 1; digitalWrite(relay1, 1); digitalWrite(relay2, 1); digitalWrite(relay3, 1); digitalWrite(relay4, 1); } if(password.evaluate()) { locked = !locked; password.reset(); passinput = 0; } if(!locked) { passinput = 0; digitalWrite(lockedled, 0); digitalWrite(unlockedled, 255); switch (key) { case 'A': digitalWrite(relay1, !digitalRead(relay1)); break; case 'B': digitalWrite(relay2, !digitalRead(relay2)); break; case 'C': digitalWrite(relay3, !digitalRead(relay3)); break; case 'D': digitalWrite(relay4, !digitalRead(relay4)); break; } password.reset(); } } } |


Just a smiling visitor here to share the love (:, btw outstanding style and design.
I have tried to use the above code but i get errors
./opt/arduino-builder/arduino-builder -compile -core-api-version 10611 -build-path /tmp/536009369/build -hardware opt/arduino-builder/hardware -hardware ./opt/cores -tools opt/arduino-builder/tools -tools ./opt/tools -built-in-libraries opt/libraries/latest -libraries /tmp/536009369/pinned -libraries /tmp/536009369/custom -fqbn arduino:avr:uno -build-cache /tmp -logger humantags -verbose=false /tmp/536009369/sketch_dec3a
/tmp/536009369/sketch_dec3a/sketch_dec3a.ino:26:81: error: too many initializers for ‘char [3][4]’
char keys[ROWS][COLS] = {{‘1′,’2′,’3’},{‘4′,’5′,’6’},{‘7′,’8′,’9’},{‘*’,’0′,’#’}};
^
/tmp/536009369/sketch_dec3a/sketch_dec3a.ino:31:1: error: ‘Password’ does not name a type
Password password = Password(“4008”);} // You can change the password here
^
/tmp/536009369/sketch_dec3a/sketch_dec3a.ino:31:38: error: expected declaration before ‘}’ token
Password password = Password(“4008”);} // You can change the password here
^
exit status 1
Any help would be great
Hi! Rich,,, Code has been updated. issue @ the variables/declarations>(unlockedled, lockedled, ledcurrentvar)
Hi.
How do you add pushbutton to this setup. So you can open the door from inside.
Just add a push button as INPUT then attach to any available pin then create a function that calls the relay channel to release solenoid or magnetic lock. do forget to release or reset the password ones open from inside.