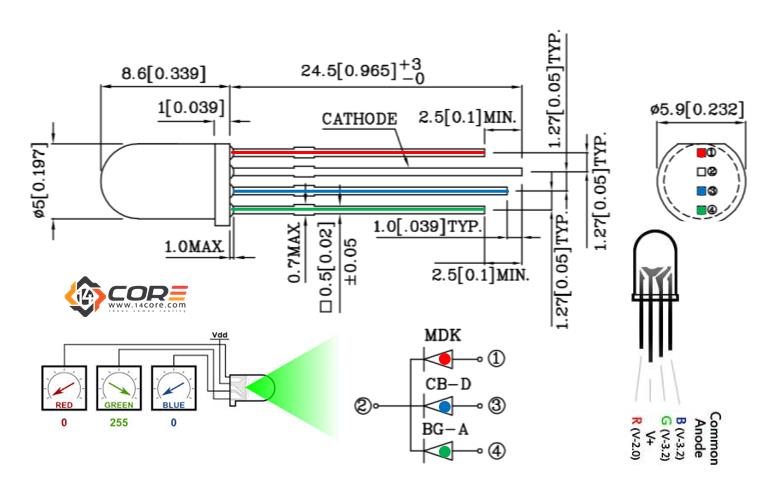
RGB(RED/GREEN/BLUE) LEDs Look just like a normal LED, however, inside of this LED has a 3 in 1 package, nside of the this LED it has Red, Green and Blue. This LED can be control using PWM(Pulse with Modulation) to be able to adjust the color brightness or mixing and other colors you want. It like your doing a painting on a canvas that you need to mix a color to suit your requirements. The Arduino has a function code that you can used to express this color mixing they called it analogWrite function.
Mixing Colors
You can mix any color as you like by varying the quantities of red, green and blue light. if you set the brightness of all the 3 LED’s into high the output will be white color. If you turn off the blue LED the output will be Yellow. you can control the brightness of each LED separately so that you can mix what possible mix of color you like. if you going to choice black color your going to switch off all the 3 colors.
Required Electronic Parts
1x Arduino
3x 270 / 220 Ohms Resistor
1x RGB LED
Jumper Wires
Wiring the RGB LED
1 2 3 4 5 6 7 8 9 10 11 12 13 14 15 16 17 18 19 20 21 22 23 24 25 26 27 28 29 30 31 32 33 34 35 36 37 |
/* Starter Number 16 @ 14core.com | Using RGB LED */ int RedPin = 11; // Define Pin 11 to use LED Red int GreenPin = 10 //;Define Pin 10 to use LED Green int BluePin = 9; // Define Pin 9 to use LED Blue void setup() { pinMode(RedPin, OUTPUT) // Define as Output; pinMode(GreenPin, OUTPUT); // Define as Output pinMode(bluePin, OUTPUT); // Define as Output } void loop() { setColor(255, 0, 0); // Set Color to Enable RED delay(1000) // Set a delay for second; setColor(0, 255, 0); // Set Color to Enable Green delay(1000); // Set a delay for second; setColor(0, 0, 255); // Set Color to Enable Blue delay(1000); // Set a delay for second; setColor(255, 255, 0); // Set Color to Enable Yellow delay(1000); // Set a delay for second; setColor(80, 0, 80); // Set Color to Enable Purple delay(1000); // Set a delay for second; setColor(0, 255, 255); // Set Color to Enable Aqua delay(1000); // Set a delay for second; } // Function to use PWM Analog Signal void setColor(int red, int green, int blue) { analogWrite(RedPin, red); // analogWrite(GreenPin, green); // analogWrite(BluePin, blue); // } |
Downloads
- RGB Diffused Light 5mm Datasheet | PDF
Pingback:Wiring the 14CORE 37 Sensors for Arduino & Raspberry Pi | 14Core.com