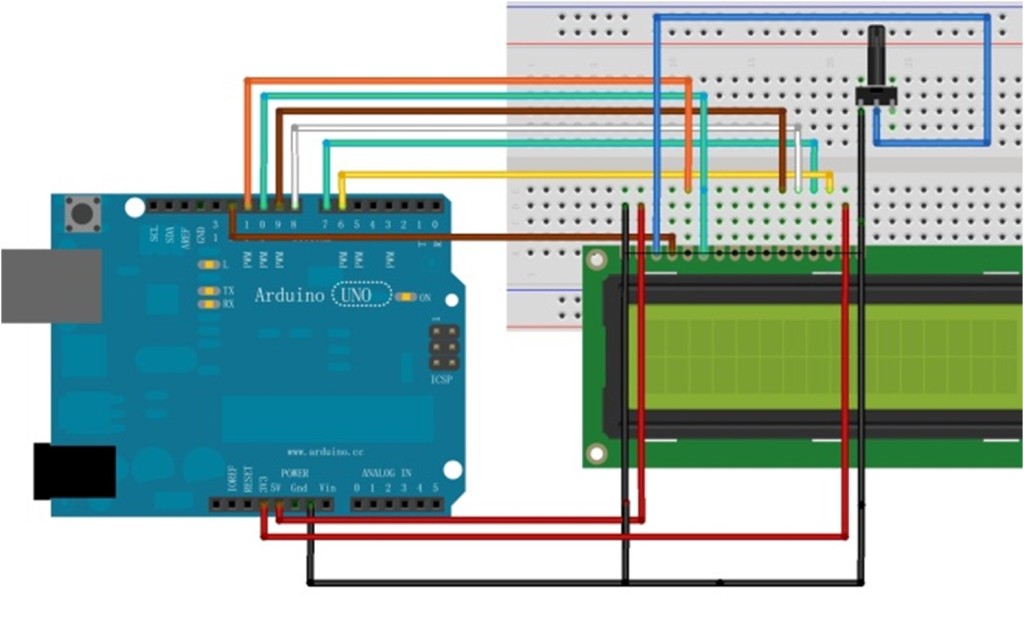
This tutorial will show you how to use the LCD Screen 16×2 in Arduino.
Electronic Parts Required
ARDUINO UNO/MEGA/PRO
1x Potentiometer ( To adjust the Brightness, Contrast of the LCD)
1x LCD Screen 1602
Jumper wire
Arduino Sketch
|
1 2 3 4 5 6 7 8 9 10 11 12 13 14 15 16 17 18 19 20 21 22 23 24 25 26 27 28 29 30 31 32 33 34 35 36 37 38 39 40 41 42 43 44 45 46 47 48 49 50 51 52 53 54 55 56 57 58 59 60 61 62 63 64 65 66 67 68 69 70 71 72 73 74 75 76 77 78 79 80 81 82 83 84 85 86 87 88 89 90 91 92 93 94 95 96 97 98 99 100 101 102 103 104 105 106 107 108 109 110 111 112 113 114 115 116 117 118 119 120 121 122 123 124 125 126 127 128 129 130 131 132 133 134 135 136 137 138 139 140 |
/* . . ........ .... .. ...... ........ MMMM MMMMM MMMMMMMMMMMMMMMMMMM MMMMMMMMMM. MMMMMMMMM MMM.MMMMMMM MMM MMM .MM.MMM MMM ......... .... ... . . . MMM MMMMMMM . .MM. MM. MMM MM. . MMM MMMMMMMMM MMMM MMMMM.MM MM MMMMMMMMMMMM. .MMM MMM. .MMM.MMMMMMMMM ........ MMM MM . M .MMMMMMMM. MMM .MMM MMMMMMMM.MMMMMMM. MM .MMM. MMMMMMMM. MMM .MMMM MMMM MMMMMM. www.14core.com . ... . . ...... */ int LCD1602_RS=12; int LCD1602_RW=11; int LCD1602_EN=10; int DB[] = { 6, 7, 8, 9}; char str1[]="Welcome to"; char str2[]="www.14core.com"; char str3[]="this is the"; char str4[]="4-bit interface"; void LCD_Command_Write(int command) { int i,temp; digitalWrite( LCD1602_RS,LOW); digitalWrite( LCD1602_RW,LOW); digitalWrite( LCD1602_EN,LOW); temp=command & 0xf0; for (i=DB[0]; i <= 9; i++) { digitalWrite(i,temp & 0x80); temp <<= 1; } digitalWrite( LCD1602_EN,HIGH); delayMicroseconds(1); digitalWrite( LCD1602_EN,LOW); temp=(command & 0x0f)<<4; for (i=DB[0]; i <= 9; i++) { digitalWrite(i,temp & 0x80); temp <<= 1; } digitalWrite( LCD1602_EN,HIGH); delayMicroseconds(1); digitalWrite( LCD1602_EN,LOW); } void LCD_Data_Write(int dat) { int i=0,temp; digitalWrite( LCD1602_RS,HIGH); digitalWrite( LCD1602_RW,LOW); digitalWrite( LCD1602_EN,LOW); temp=dat & 0xf0; for (i=DB[0]; i <= 9; i++) { digitalWrite(i,temp & 0x80); temp <<= 1; } digitalWrite( LCD1602_EN,HIGH); delayMicroseconds(1); digitalWrite( LCD1602_EN,LOW); temp=(dat & 0x0f)<<4; for (i=DB[0]; i <= 9; i++) { digitalWrite(i,temp & 0x80); temp <<= 1; } digitalWrite( LCD1602_EN,HIGH); delayMicroseconds(1); digitalWrite( LCD1602_EN,LOW); } void LCD_SET_XY( int x, int y ) { int address; if (y ==0) address = 0x80 + x; else address = 0xC0 + x; LCD_Command_Write(address); } void LCD_Write_Char( int x,int y,int dat) { LCD_SET_XY( x, y ); LCD_Data_Write(dat); } void LCD_Write_String(int X,int Y,char *s) { LCD_SET_XY( X, Y ); //set address while (*s) //write the string { LCD_Data_Write(*s); s ++; } } void setup (void) { int i = 0; for (i=6; i <= 12; i++) { pinMode(i,OUTPUT); } delay(100); LCD_Command_Write(0x28); delay(50); LCD_Command_Write(0x06); delay(50); LCD_Command_Write(0x0c); delay(50); LCD_Command_Write(0x80); delay(50); LCD_Command_Write(0x01); delay(50); } void loop (void) { LCD_Command_Write(0x01); delay(50); LCD_Write_String(3,0,str1); //Row1, column4 delay(50); LCD_Write_String(1,1,str2); //Row2, column2 delay(5000); LCD_Command_Write(0x01); delay(50); LCD_Write_String(0,0,str3); delay(50); LCD_Write_String(0,1,str4); delay(5000); } |
Download the source code here | 14Core LCD16x02
Starter # 11 How to use 16×2 LCD Screen with Arduino with Source Code


