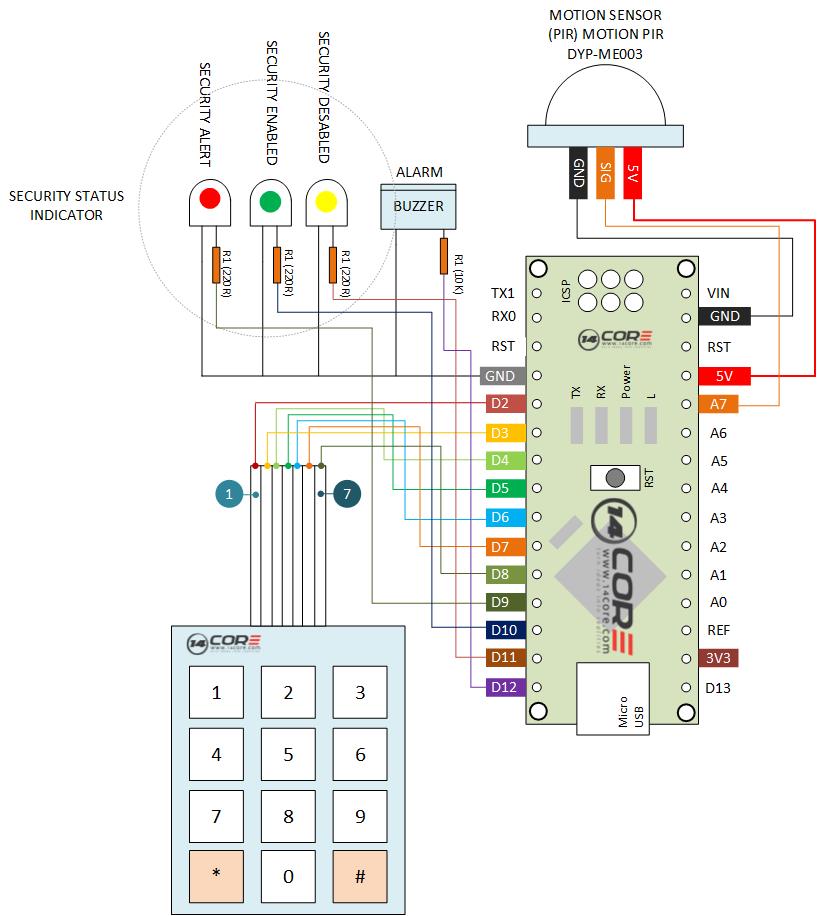
/*
TEST CODE for SECURITY ALARM SYSTEM
*/
#include <Keypad.h> // library for keyboard
#include <Password.h> // library for password
Password password = Password( "1234" ); // password
const byte rows = 4; // four rows
const byte cols = 3; // three columns
char keys[rows][cols] = { // keys on keypad
{'1','2','3'},
{'4','5','6'},
{'7','8','9'},
{'*','0','#'}
};
byte rowPins[rows] = {2, 7, 6, 4};
byte colPins[cols] = {3, 1, 5};
Keypad keypad = Keypad(makeKeymap(keys), rowPins, colPins, rows, cols);
#define sensorz 14 // D14 is A0, pin for PIR sensor data
//#define contact 15 // D2, pin for on/off alarm
#define alrm 13 // D13, pin for syren, buzzer
#define redLed 11 // D13, pin for red led
#define greenLed 9 // D9, pin for green led
#define yellowLed 10 // D10, pin for blue led
int sensorzData;
unsigned long ceas, timpmemorat;
int intarziereactivare = 20; // To delay for standby to armed
int intarzieredezactivare = 10; // To delay for triggered to alarm activated
int timpurlat = 10; // Time of alarm is on
// This is the variable for states "0"
char caz = 0;
int sistem = 0; // system is 0 for off and 1 for on
/*
States for
0. - off
1. - stand-by
2. - waitting
3. - countdown
4. - alarm
*/
void setup()
{
keypad.addEventListener(keypadEvent); // se creaza un obiect pentru urmarire apasare taste
// Serial.begin(9600);
// Serial.println("Secutiry Alarm System");
// Serial.println("www.14core.com");
pinMode(alrm, OUTPUT);
pinMode(sensorz, INPUT);
// pinMode(contact, INPUT);
pinMode(redLed, OUTPUT);
pinMode(yellowLed, OUTPUT);
pinMode(greenLed, OUTPUT);
// pinMode(contact, INPUT_PULLUP);
}
void loop()
{
ceas = millis(); // read the internal clock
keypad.getKey();
// if(digitalRead(contact) == HIGH)
if (sistem%2 == 0)
{
// alarm is off
analogWrite(greenLed, 0);
analogWrite(redLed, 0);
analogWrite(yellowLed, 240);
digitalWrite(alrm, LOW);
caz = 0;
// Serial.println("System is OFF !");
}
else
{
// alarm is on
if(caz == 0)
{
caz = 1;
timpmemorat = ceas;
analogWrite(yellowLed, 0);
}
if(caz == 1) // system waitting
{
/* analogWrite(greenLed, 240);
delay(100);
keypad.getKey();
analogWrite(greenLed, 0);
delay(100);
*/
if ((ceas%1000)<500) analogWrite(greenLed, 240);
else analogWrite(greenLed, 0);
keypad.getKey();
if(ceas >= timpmemorat + intarziereactivare * 1000) {caz = 2;}
// Serial.println("System is waitting !");
}
if(caz == 2) // system is armed
{
analogWrite(greenLed, 240);
keypad.getKey();
// sensorzData = analogRead(sensorz);
sensorzData = digitalRead(sensorz);
// Serial.print("sensorzdData = ");
// Serial.println(sensorzData);
// if(sensorzData > 600) {caz = 3; timpmemorat = ceas;}
if(sensorzData == HIGH)
{
caz = 3;
timpmemorat = ceas;
analogWrite(greenLed, 0);
}
// Serial.println("System is armed !");
}
if(caz == 3) // system is triggered and countdown
{
/* analogWrite(redLed, 240);
delay(100);
keypad.getKey();
analogWrite(redLed, 0);
delay(100);
*/
if ((ceas%500)<100) analogWrite(redLed, 240);
else analogWrite(redLed, 0);
keypad.getKey();
if(ceas >= timpmemorat + intarzieredezactivare * 1000) {caz = 4; timpmemorat = ceas;}
// Serial.println("System is triggered and countdown !");
}
if(caz == 4) // syren (buzzer) is active
{
digitalWrite(alrm, HIGH);
analogWrite(redLed, 240);
// Serial.println("Syren is active !");
keypad.getKey();
if(ceas >= timpmemorat + timpurlat * 1000) {caz = 2; digitalWrite(alrm, LOW); analogWrite(redLed, 0);}
}
}
}
//take care of some special events
void keypadEvent(KeypadEvent eKey){
switch (keypad.getState()){
case PRESSED:
Serial.print("Pressed: ");
Serial.println(eKey);
switch (eKey){
case '*': checkPassword(); break;
case '#': password.reset(); break;
default: password.append(eKey);
}
}
}
void checkPassword(){
if (password.evaluate()){
// Serial.println("Success");
sistem++;
password.reset();
//Add code to run if it works
}else{
// Serial.println("Wrong");
//add code to run if it did not work
password.reset();
}
}


Can it use arduino uno with speaker rather using NANO an buzzer?
Yes why not, however you need to use sound driver or WTV020SD which is hookup to your arduino board. :)
How to install library Password.h and keypad.h ? Please
#include // library for keyboard
#include
Goto your IDE installation folder and navigate to the library folder and copy the code library folder you want to use to into your project. :D