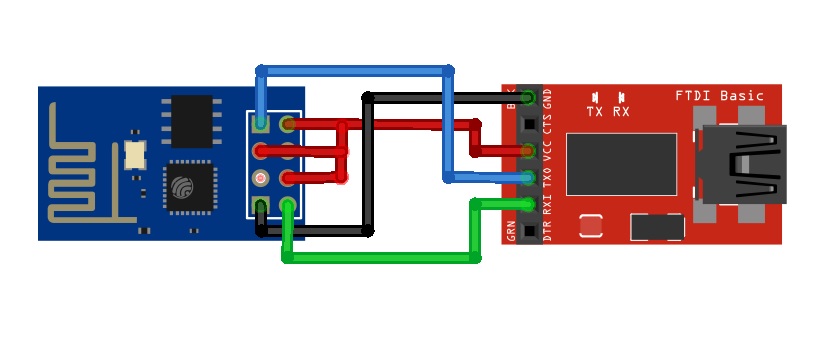
To upload a code to ESP8266, you should connect your ESP8266 to your FTDI USB Programmer: as the image illustration below.

Coding Your fist LUA Script a blinking an LED
[crayon-67f071867c046591183037/]
Burning your code into the chip

ESP8266 + FTDI Programmer connected to your computer, go to the ESPlorer IDE:
At the top right cornet of ESPlorer IDE follow the steps below:
- Click the Refresh button
- Select the COM(Communication) port for your FTDI programmer
- choose your baud rate (Commonly used 9600)
- Click Open

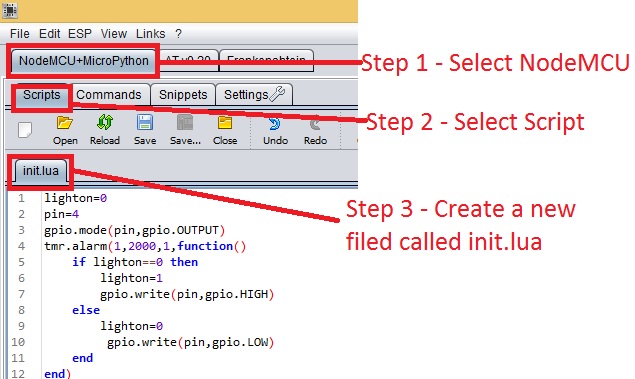
- Select NodeMCU
- Open a Scripts
- Create a new filled called [“14core-testcode.lua”]

Copy your Lua script (which you created in the previous section) to the IDE code section.
Save your code to your ESP8266 at the left bottom corner [ Save to ESP] in the output window you should see exactly command are being sent to ESP8266.
Note: If your want to delete your code, you can simply type file.remove (“14core-testcode.lua”) and press the button [SEND]. or you can type the command file.format() to delete all the files save in ESP8266 Chip.
If your done burning your code to ESP8266 you can now unplug ESP8266 board from your computer then you supply a 3.3v to the ESP8266 board itself as the schematics below.
Download the source code here | ESPXX LED CODE LUA SCRIPT
Download ESPlorer IDE | Download