NodeMCU Flasher is a firmware programmer made for NodeMCU development kit, by using this program you program the ESP8266 board by send binary code directly to the NodeMCU Development Board.
Before you can program the NodeMCU you need to set GPIO-0 to LOW before you can burn the code inside on the chip and it will do automatically the flashing process .
Instruction 1. / Before you can burn the firmware into ESP8266 you need to set the GPIO0 to LOW
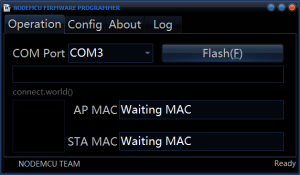
Instruction 2. / you need to wait for a moment.

Instruction 3. / If the status/progress bar reach to 100% means “Program success”

Setting up your own firmware

When the file path showing some error example: file not found/file not exist), the color of the line will become red.
You can use some special bin path to do some experiment.
The blank.bin file: INTERNAL://BLANK
The esp_init_data_default.bin file(for 26 MHz crystal): INTERNAL://DEFAULTD
Download the NodeMCU Flasher Tool Here | Download


Pingback:Wiring the ESP8266 as Stand alone | 14Core.com
Pingback:ESP8266 활용 가이드 - NodeMCU Lua 개발환경 | Roaster House