


In this illustration i will going demonstrate here how to build an ESP8266 standalone Web Server coded in LUA Script with ESPlorer, and remotely control the LED via Network.
Electronic Parts we need to accomplish this project.
- ESP8266 Module Board
- LED(Light Emitting diode)
- 220k Resistor
- 3.3v Power Regulator
Software Required for this demonstration.
ESPlorer IDE | Installation Guide | Programming Guide | Download
NodeMCU Flasher for Windows | Programming Guide | Download
NodeMCU is a firmware that allows you to do a programming inside the ESP8266 module using the LUA script similar to Arduino Board. With just a few lines of code you can control and connect via WiFi the ESP8266 GPIO(General Purpose Input Output) turning your ESP8266 intro a wireless web server, this is the fist step to make an Internet of Things.

Flashing your ESP8266 / Open NodeMCU Flasher to flash the ESP8266 follow this link how to flash ESP8266 using NodeMCU Flasher.
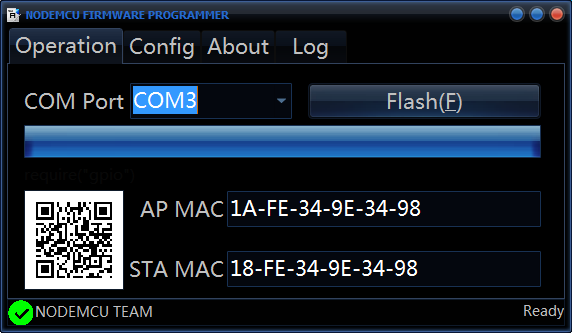
You need to FLASH and it should start the process.
Note: You need to change some settings on the advance tab, after this process, it should see a green check icon.
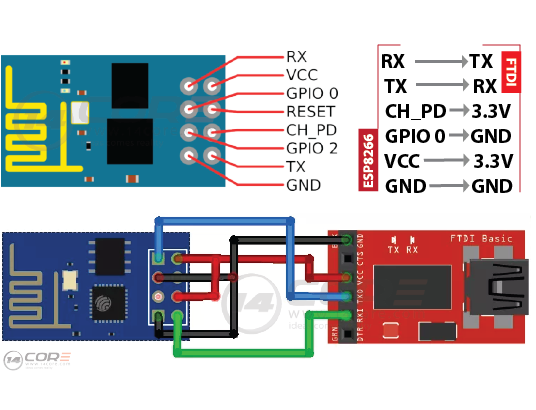
Below the schematics used this project.
Follow this schematics to create your ESP8266 stand alone server to control 2 LED


Software Installation
In this process we will going to use the ESPlorer IDE to program the ESP8266 Module Board. Please follow the instruction below.
1. Download the ESPlorer | Installation Manual | Download |
2. Unzip the folder
3. Open the folder look for “ESPlorer-master \ ESPlorer \ dist”
4. Run the “ESPlorer.jar” you need to have JAVA installed in your system


Uploading LUA Script
1. Connect the FTDI(Future Technology Devices International) USB RS232 Programmer to your PC
2. Select port.
3. Click open & Close
4. Select NodeMCU with MicroPhython tab
5. Create new file named “core.lua”
6. Click Save to ESP

The LUA Script
Flash the code into ESP8266 using ESPlorer. your file should named “core.lua”
[crayon-67f0691438725288298209/]
Download the source code here | core.lua
You need to replace your Wifi Station detail find the Network Name & the Password of your choice in the script above.
Access your web server from your smart phone of PC
Restart your ESP8266 Web Server, after you restart the “IP ADDRESS” on the serial monitor screen, to access the web server we need to type the http:// protocol along with the IP address.
“Example: http://192.168.250.100”


