In this procedure we will going to integrate the ESP8266 Scripting to Arduino IDE for easy coding and provide more power full and easier to use. if you don’t have an idea how the ESP8266 works kindly visit this link, for starters and how to flash and running the NodeMCU on ESP8266.
Installing the ESP8266 to Arduino IDE as working environment.
Download the Official Arduino IDE here > https://www.arduino.cc/en/Main/Software
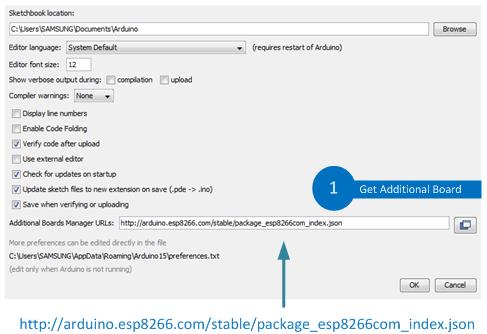
Run the Arduino IDE then Go to File –> Preferences and add the link
http://arduino.esp8266.com/stable/package_esp8266com_index.json
to add the Additional Boards Manager URLS.
Step 1:
Step: 2 | Go to Tools > Board > Boards manager
Step:3 & 4 | Type the ESP8266 in the text input box, As you can see the ESP8266 as an option. select and press install
Step: 5&6 Last Steps | Now you have the ESP8266 board configure as the Generic ESP8266 Module if you have the common module
Done! | Click here for another option via GitHub
Below are the steps for flashing and programming the ESP8266
- Flashing ESP8266 with ESP8266 Flash Tool Steps
- Wiring and configure the ESP8266 with AT-Command Steps
- Wiring and Flashing the ESP8266 via TTL UART Bridge


Pingback:Wiring NodeMCU ESP8266 12E with i2C 16×2 LCD Screen | 14Core.com
Pingback:Wiring the ESP8266 12E Remote Soil Moisture Temperature & Humidity Monitor | 14Core.com
Pingback:Wiring ESP8266 12/12E with G1/2 Liquid / Water Flow Sensor on Wireless Monitoring | 14Core.com
Pingback:Wiring & Programming ESP8266 12/12E – NodeMCU WiFi Remote Client/Server Mode | 14Core.com