In this illustration i will going demonstrate here how to build an ESP8266 standalone Web Server coded in LUA Script with ESPlorer, and remotely control the LED via Network.
Electronic Parts we need to accomplish this project.
- ESP8266 Module Board
- LED(Light Emitting diode)
- 220k Resistor
- 3.3v Power Regulator
Software Required for this demonstration.
ESPlorer IDE | Installation Guide | Programming Guide | Download
NodeMCU Flasher for Windows | Programming Guide | Download
NodeMCU is a firmware that allows you to do a programming inside the ESP8266 module using the LUA script similar to Arduino Board. With just a few lines of code you can control and connect via WiFi the ESP8266 GPIO(General Purpose Input Output) turning your ESP8266 intro a wireless web server, this is the fist step to make an Internet of Things.

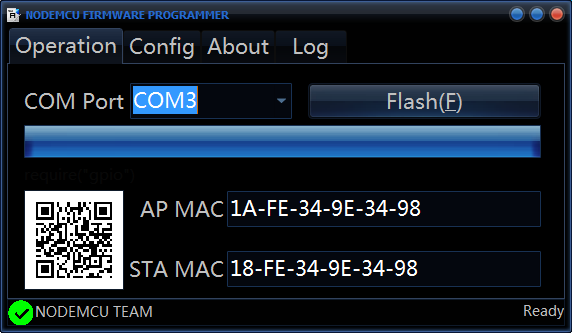
Flashing your ESP8266 / Open NodeMCU Flasher to flash the ESP8266 follow this link how to flash ESP8266 using NodeMCU Flasher.
You need to FLASH and it should start the process.
Note: You need to change some settings on the advance tab, after this process, it should see a green check icon.
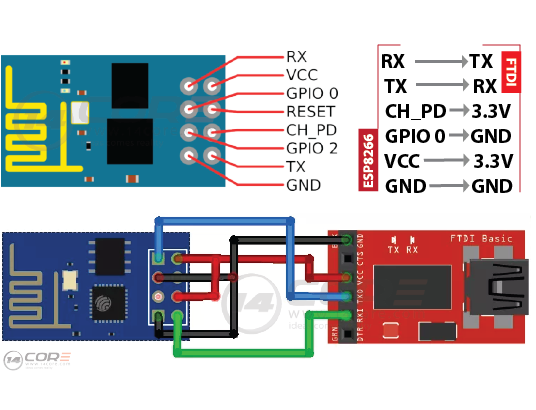
Below the schematics used this project.
Follow this schematics to create your ESP8266 stand alone server to control 2 LED

Software Installation
In this process we will going to use the ESPlorer IDE to program the ESP8266 Module Board. Please follow the instruction below.
1. Download the ESPlorer | Installation Manual | Download |
2. Unzip the folder
3. Open the folder look for “ESPlorer-master \ ESPlorer \ dist”
4. Run the “ESPlorer.jar” you need to have JAVA installed in your system

Uploading LUA Script
1. Connect the FTDI(Future Technology Devices International) USB RS232 Programmer to your PC
2. Select port.
3. Click open & Close
4. Select NodeMCU with MicroPhython tab
5. Create new file named “core.lua”
6. Click Save to ESP
The LUA Script
Flash the code into ESP8266 using ESPlorer. your file should named “core.lua”
Download the source code here | core.lua
You need to replace your Wifi Station detail find the Network Name & the Password of your choice in the script above.
Access your web server from your smart phone of PC
Restart your ESP8266 Web Server, after you restart the “IP ADDRESS” on the serial monitor screen, to access the web server we need to type the http:// protocol along with the IP address.
“Example: http://192.168.250.100”


Pingback:ESP8266 활용 가이드 - NodeMCU Lua 개발환경
I’m using the NodeMCU Development Kit, but all I had to do was change the LED numbers to
led1 = 0
led2 = 4
and everything worked right out of the box. Impressive!
Hi, your example work with IE, Mozilla, Chrome… but not with Safari?
That’s because there’s quite castrated and not very standard-compliant version of the HTTP response. Try adding this:
buf = buf..”HTTP/1.1 200 OK\nContent-Type: text/html\n\n”;
after 21th string, so that it will return HTTP/1.1 200 OK to the browser. It will not make strictly valid HTTP response, nevertheless it works for safari in my case.
This was good until NodeMCU update (which won’t flash with the NodeMCU flasher. EXPlorer doesn’t work with it either.
How to do this flashing with Arduino and without FTDI ??
or can we make standalone web server with Arduino and esp8266??
You need to configure or set the command to your ESP8266 to auto run the Luascript when the module plug to the power. If you want to make it as standalone u need a regulator to supply 3v to vcc and gnd to gnd.
hi
i changed code for new firmware (2.1) it connected to modem but cannot open html page
my code:
wifi.setmode(wifi.STATION)
station_cfg={}
station_cfg.ssid=”my ssid”
station_cfg.pwd=”password”
wifi.sta.config(station_cfg)
wifi.sta.connect()
print(wifi.sta.getip()) — Dynamic IP Address
led1 = 3
led2 = 4
gpio.mode(led1, gpio.OUTPUT)
gpio.mode(led2, gpio.OUTPUT)
srv=net.createServer(net.TCP)
srv:listen(80,function(conn)
conn:on(“receive”, function(client,request)
local buf = “”;
local _, _, method, path, vars = string.find(request, “([A-Z]+) (.+)?(.+) HTTP”);
if(method == nil)then
_, _, method, path = string.find(request, “([A-Z]+) (.+) HTTP”);
end
local _GET = {}
if (vars ~= nil)then
for k, v in string.gmatch(vars, “(%w+)=(%w+)&*”) do
_GET[k] = v
end
end
buf = buf..”ESP8266 Web Server”;
buf = buf..”GPIO0 ON OFF“;
buf = buf..”GPIO2 ON OFF“;
local _on,_off = “”,””
if(_GET.pin == “ON1”)then
gpio.write(led1, gpio.HIGH);
elseif(_GET.pin == “OFF1”)then
gpio.write(led1, gpio.LOW);
elseif(_GET.pin == “ON2”)then
gpio.write(led2, gpio.HIGH);
elseif(_GET.pin == “OFF2”)then
gpio.write(led2, gpio.LOW);
end
client:send(buf);
client:close();
collectgarbage();
end)
end)
Pingback:ESP8266 활용 가이드 - NodeMCU Lua 개발환경 | Hard Copy World
코드를 깜박이는 동안 오류가 있습니까? 아마도 일부 변수가 선언되지 않았습니다.