In this illustration we will going to wire the I2C or 2 wire connection in our Aruduino Board with the 16×2 Liquid Crystal Display, you can also use the 20×4 LCD, but on this demonstration we will going to wire the 16×2 LCD.
On this I2C module you can control an LCD with ease using 2 wires connected to your Arduino board via input SDA and the SCL see the illustration below to find the correct pin where you can connect your I2C module.
Diagram of I2C Module
At the left side of the module we have 4 pins, and two are voltage and ground, and the other two are the I2c (SDA/ and SCL). The board has a tripper pot to adjust the contrast of the LCD, and the jumper located at the opposite side allows the back-light controlled by the program or remain off.

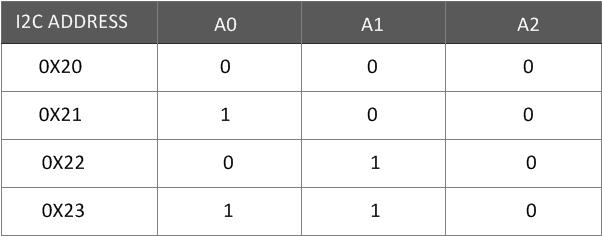
I2C Address
By default the module is configured with the address 0x27, but you can change this using the address pins A0, A1 and A2 located at I2C module board, see the table below.
Wiring I2C Module to Arduino UNO R3 Board

Wiring I2C Module to Arduino MEGA2560 Board

The I2C module has 16 pins that can be directly connected to the display, or you can test the connection in the breadboard, if your using MEGA2560 use the pin 20(SDA) and 21 for (SCL)
To control the I2C module you need to include the LiquidCrystal_i2C library, can be download here or download it below. Unzip the zip file and rename the folder to LiquidCrystal to LiquidCrystall2C, copying it to the folder libraries into the Arduino IDE. Rename the folder to avoid conflicts with LiquidCrystal libraries that is already built into the Arduino IDE.
The commands to work with the display control are almost similar to the LiquidCrystal library we use normally with commands such as lcd.begin(), lcd.print() and lcd.setCursor(). The commandlcd.setBacklight() allows you to adjust or activate the backlight of the LCD.
Download i2C LiquidCrystal Code Library | Zip


I would like to know how to connect some 25 i2c modules with 2 wires and where i should take the address for each card
you can wire up to 1008 slave devices. master and slaves you just need to choose from the onchip address selection, connected to your IO expander like 23017, 8574, 8574A, 8575, 9555.
> 23016 and 9555 (NXP) have 16 bits of digital I/O at addresses.
> 9698 from Phillips has 40 bits of digital I/O, can be addressed at 64 different addresses.
> 8575 has 16 digital I/O bits at addresses 0x20-0x27.
Pingback:아두 이노 Lcd 출력 | [아두이노] 아두이노로 I2C Lcd 다양하게 제어하기 상위 235개 답변
Pingback:Top 18 아두 이노 Lcd 출력 Top Answer Update