In this tutorial you will going to learn how to control and drive the DC Motor on Arduino, you will also learn how to used the analog output PWM or Pulse with Modulation to control the speed of the motor by changing the value of 0 ~ 255 from the serial monitor.
Electronic parts required
ARDUINO Uno
1x 6v DC Motor (DC motor is a electrical machines that converts DC Direct Current electrical power into mechanical power. Most common types rely on the forces to produces a magnetic fields.)

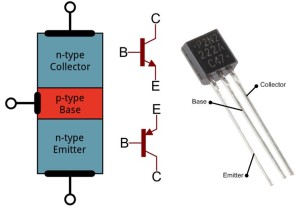
1x PN2222 Transistor ( You cannot directly place the motor to the Arduino digital output, there is a change that you could damage the Arduino. Transistor PN222 can be used as a switch that can handle small current from the Arduino digital output to control the bigger current of the motor )

1x 1N4001 Diode ( Anode Negative – / Cathode Positive + )

1x 270 Ohms Resistor
Solder less breadboard
Jumper Wires
Wiring the motor on to Arduino
Placing the transistor should be in the right way, please see the diagram above to know the transistor pin, the same with the diode. Diode only allows the flow of current in one direction. see also the diagram above for the diode pin out. the striped end of the diode should be towards into +5v at Arduino power line.
The PN222 Transistor has a 3 leads most of the electricity flows from the collector going to the emitter, this will only happen if a small amount of current flowing into the base connection. this small current will supplied by the Arduino digital output.
The digital 5 of the Arduino is connected to the resistor the same like using an LED this resistor will limits the current flowing into the transistor through the base, the diode connected across the connection of the motor, when you turn the power off to the motor, you will get a negative SPIKE of voltage that can damage your Arduino or your transistor, the diode protects against this SPIKE by shorting out any such reverse current from the motor.


Hi there. I want to use this to control the speed of a small 3v motor, will I need to change any of the components or programming? Thanks!
Hi! you can control motor speed by using Pulse w/d Modulation or PWM by changing the value of 0 to 255.